Tuesday, May 26, 2009

Creating the perfect CUSTOM COVER for your Storybook!


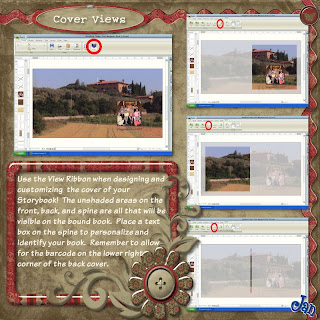
Ready to put the perfect cover on your StoryBook? Be sure to use the View Ribbon to make sure everything is just where you want it! First, go to the Home ribbon and change from "Pages" to "Cover" in the View section. You'll be able to view the default cover, which will either be an empty cover (if you have started with blank pages) or it will be the cover that comes with the pre-designed pages you are using. You may choose to select a different cover template, or you may import an existing cover. Choose whichever of these suits your current project.

Next, go to the View ribbon and look at the last three icons in the Preview section. You will be able to see exactly what will appear on the completed and bound front cover, spine, and back cover. Be aware that much of the 'total' view of the cover is not seen on the finished book due to the binding process. Use the ruler at the top and left side of the editing screen and the properties key (right click on any element, then choose properties) to help you position the elements on your cover.

Notice on the example page that you can fill the entire cover (front, back, and spine) with one photo. You can add other photos on top of it, or you can fill the cover with lots of photos. You can select a single image and add a title, you can put images on the front and not the back, or you can have images on both the front and back. You can design the cover any way you want it! You may use any paper you have or any color as the background of your cover - add gradients, texture, overlays - design the cover just like it is another page! The View ribbon allows you to see what the finished product will look like.

Add text boxes to title the book, and remember that you can even put a title, along with your name and/or the date, on the spine. To add text to the spine, simply create a text box that is wide across and narrow from top to bottom. Go to the Layout ribbon and rotate the text box 90 degrees to the right (clockwise). Using the Spine view, position the text box such that it will be visible on the spine. The actual text box can be slightly larger than the unshaded area on the Spine view as long as you are certain that the text itself will be printed only on the spine. This will allow you to use the largest font possible to create the text you'd like. I love adding my name to the spine and feeling like I am a published author!

The cover of your book will set the tone for the entire book, and an interesting cover will invite people to pick it up and look inside! Putting the title and date on the spine will allow you to quickly choose the book you want off the MANY StoryBooks on your shelves. Have fun with it!

shared by Jan McCallum, Creative Memories digital design team

Sunday, May 10, 2009

Instructions for upgrading & installing Memory Manager 3.0

These are all tips shared from other consultants and our wonderful Tech Support.

If you already have Memory Manager 2.0 and you are upgrading you need to take these precautionary steps.

1. Open your Memory Manager Vault. (if you have more than one you need to do this with each one, open each vault one at a time and do steps 2&3)

2. On the top tab go to Memory Vault>Manage your Memory Vault. Then click on Run Health Check. If their is any thing that needs repair the program will walk you through it and it is really simple. If it is healthy it will tell you nothing needs to be done. Now this is important so that when your running 3.0 all your information will convert over.

3. Then you need to make a back up of your vaults. (I am NOT talking about a shadow copy. You need to go wherever your vault is stored and make a copy. This could take over an hour or so to copy depending on how much information there is. (I'd get it started and go do something else) Do this for each vault. This is really just a extra safety step, not necessary but advised because your shadow copy for 2.0 will NOT work in 3.0.

4. After you have made your back ups it time to install 3.0. Either you have ordered a disk or a download from my website. (www.mycmsite.com/Helen)

NOTE: You need to have your serial number from 2.0 to activate your 3.0 upgrade. Either have your original 2.0 case with the serial number on the back OR find your serial number by going into MM 2.0 and go to Help>About

If you have a disk just insert the disk and follow the prompts. If you are going to Download a copy you can either save or run right from the link that you click to download. I first clicked on Run, but I also re-visited the link and saved a copy so and made my own disk. Be sure to write down the serial number. You will also get a link to download the user guide.

5. Once MM 3.0 is successfully installed you can remove and uninstall 2.0. Once your vault is moved to 3.0 it will no longer work in 2.0! To remove or uninstall go to your control panel and go to add or remove programs and find Memory Manager 2.0 on the list and click remove. (these instructions may differ if you use vista) That's it!

Wednesday, May 6, 2009

SB+ Tecnhique - Photo Mats Technique


Did you know that you can use the mat tool to 'cut' photos into different shapes? That's what the cutout box is for on the Mat Tool!

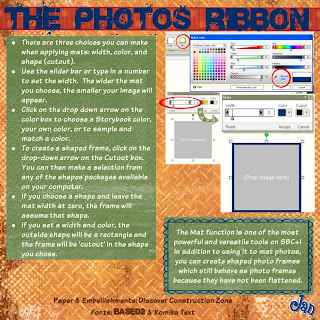
To use the Mat Tool, you'll go to the Photos Ribbon. First, select the element (or elements) that you want to mat. Next, choose the width of the mat, then the color, and then the shape (cutout). If you don't choose a cutout, it will default to a rectangle, and you can easily mat all of the square and rectangular images on your page.

Remember that you can mat multiple images at once - just choose the first one, then hold the shift key while selecting all of the other elements you'd like to mat. This makes it easy to make sure all of the photos have mats the same size and color, which generally leads to a pleasing page. Be sure to use the color sampling tool to match mat colors with other colors on your page.

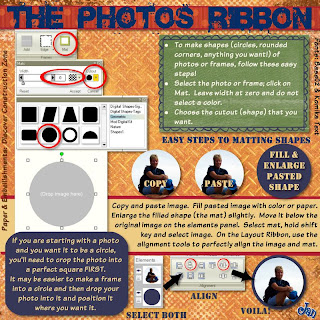
To 'cut' a photo or photo frame into a shape, don't choose a width or color, and choose the shape you'd like. Now the mat tool will make the picture the shape you've chosen. It's an easy way to 'round the corners' too. Just leave the mat width at 0, leave the checkerboard (opacity) instead of choosing a color, and then choose the shape that has rounded corners (from the Geometric shapes package). Play around with it!

If you select a color and a cutout, the Mat tool only makes rectangular shaped mats, with the shape you've chosen cut out around the photo. In other words, it would be like putting an oval or circle shaped photo on a rectangular or square mat.

If you want a photo 'cut' into a circle and mounted on another circle, the best way to do that is to use the mat tool so that the photo will retain its photo properties - you will still be able to zoom in on it, move it around within the frame, edit it, etc. The easiest way to make sure your image will be a perfect circle is to add an empty square photo frame to your page. Right click on it, go to Properties, and make sure that it is a square. Correct measurements here, if needed. Now use the mat tool to make the frame a circle and then add your image to it. An alternate method is to cut the photo with the cutting tools, but this requires flattening, which means the photo will no longer behave as a photo. We will get into flattening later - don't stress over it now!

Once you have your shaped photo (regardless of the shape you've chosen), it's a snap to mat it. This is what I do (and there are other ways!): Copy the shape you just made and paste it. Drag a corner of the new shape to enlarge it slightly. Fill it with the color or paper (tools ribbon) you want. On the elements panel, drag it down so that it is under the image you want to mat.

Select the mat, hold the shift key, and select the original photo, too. On the layout ribbon, in the alignment section, click on the second button from the left on the top row and the next to last button on that same row (align selected elements vertically & horizontally with last selected element). I always go ahead and group the two while they are still both selected and I'm on the layout ribbon anyway. Now you're all matted and ready to go! Have fun with it!