Tuesday, September 15, 2009
Monday, September 14, 2009
Add some WORD ENHANCEMENTS
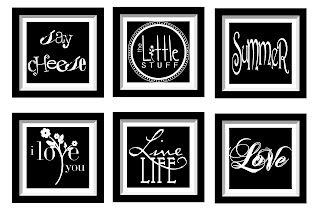
To create these in Storybook Creator 3.0 follow these steps:
Insert a new PHOTO
Click on the FORMAT PHOTOS ribbon
Choose SELECT
From the drop down arrow, select FRAMES
This is the SIMPLE BLACK # 2 Frame
Then, I turned the inside all black, added the text enhancements (in white) and it's done. This is a 4x6 photo size, which means each of these "word enhancements" is 1.75" square. The perfect size to decorate the Accordian Tag Booklet. Add a few demensional paper flowers & ribbons and you're done.
Friday, September 11, 2009
Accordian Tag Booklet

Friday, July 10, 2009
Become the next American Idol - supersized!
Thursday, July 2, 2009
Tips for photographing Fireworks!
Tips for Shooting Fireworks:
- Bring a tripod and flashlight to the fireworks display. It's dark and you'll need longer exposures, so use the tripod to avoid blurry pictures. The flashlight will help you adjust your camera settings in the dark.
- Set your camera to Fireworks mode (if you have that feature), which will automatically take care of the settings. If you don't have Fireworks mode, set your camera to Manual mode: ISO 200, aperture f/8, and shutter speed between 5 and 15 seconds. After you take a few pictures, take a look at how they are turning out, and adjust the shutter speed accordingly (leave the ISO and f-stop alone).

- Include a landmark in the photo, such as a statue, stadium, park, lake, or whatever the surrounding area includes. As the fireworks explode, they will light up the landmark beautifully.
- Take a lot of pictures! You can take over 100 pictures and only keep 2 great ones. The more pictures you take, the greater chance you have of capturing the perfect shot. Be a ruthless editor; you only need one or a few photos to frame andshare!
- Remember that fireworks come fast and furious during the finale of the show. Therefore, you may need to decrease your shutter speed. 15 seconds will likely be overexposed during the finale. Try 5 seconds instead.
Wednesday, July 1, 2009
Table Tent Cards for your July 4th parties!
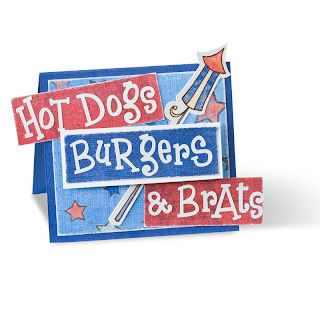
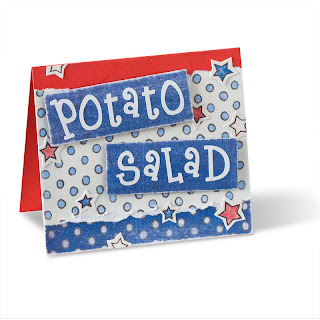
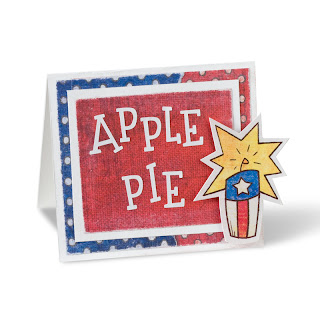
How to create:
For each tent, begin with a cardstock base that measures 7" x 4". Fold in half to create tent that measures 4" x 3-1/2".
Decorate front of each tent by adding layers of stickers, patterned paper and cardstocks. Use Foam Squares to adhere some pieces to tents for dimension. (TIP: to avoid any stickers that are propped up with Foam Squares from "smooshing" down and sticking to project, coat with baking soda. NOTE: adhere foam square to backside of sticker, then BEFORE peeling away protective sheet from foam square, sprinkle baking soda across back of sticker. Remove protective sheet, then adhere to project).
Create labels for dishes by adhering letter stickers to papers and trimming around. Add distressing by sanding edges of patterned papers.
Projects created using Cardstocks - White, Cranberry & Royal Blue, Primary 4th of July Additions, Swirly White ABC/123 Stickers, Foam Squares, Scissors and Sandpaper.
Designed by Addie Rysavy
Friday, June 26, 2009
Create a digital Ice Cream Cone with no calories!
Saturday, June 20, 2009
Creating Digital Watches!
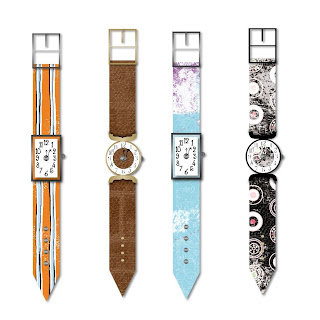
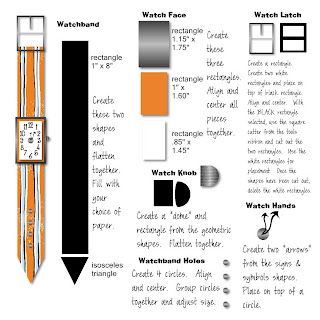
This idea was shared via The Project Center on my personal website.
Graduation Party cupcakes!
Circles of Fun with Diva & Grunge

There's a fun, new CCS (Custom Cutting System) template coming out on July 1st - the JUMBO Circle! Use it to jazz up your traditional pages....but you can also create this effect digitally. Just select the TOOLS ribbon and cut a Circle Shape. Then fill that cut piece with a coordinating piece of paper. And voila! These examples are also showcasing the NEW Grunge and Diva collections that are coming out July 1st (both in traditional and digital formats). Have fun!
Monday, June 15, 2009
Create & Re-Use Workable Borders on your SB pages
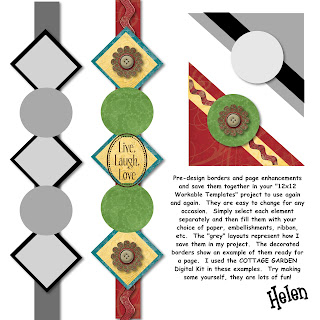
It's easy to transfer the "Fast Formulas" scrapbooking concepts to your digital pages. Create some quick & easy borders to use again & again by just clicking to change the papers & embellishments.
I created these 12x12 borders with the SHAPES and saved them as different shades of grey. You can fit several on one page. Keep this page in your 12x12 Workable Templates project file so you can easily refer back to it. Then, just cut/paste the border to your project and click to fill the different sections with the paper, ribbon and embellishments of your choice. Fast Formulas are now SUPER FAST! Have fun!
Wednesday, June 10, 2009
Upgrade to MM3.0 and save $10 in June
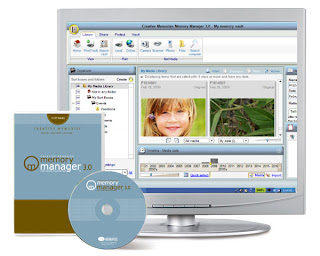
There are so many GREAT new benefits and features with the 3.0 upgrade. Here are just a few…
Memory Manager 3.0 has enhanced features and more powerful editing tools than ever before. Here are the newest features in Memory Manager 3.0:
o More compatibility with StoryBook Creator Plus Software. You can easily add photos to a new or existing StoryBook.
o Change just part of a photo with the new Selection Ribbon. For instance, you can select one part of your photo to stay in color and easily make the rest of the photo black and white.
o Journal boxes in albums now offer rich text editing so you can have multiple fonts, styles, sizes, colors, etc. in one journal box.
o Clone a portion of one photo onto another photo.
o When you are importing photos, the software alerts you if one or more of your photos appear to already be in your Media Library.
o Delete an unwanted photo from the Media Library without having to leave editing; just delete and move to the next photo
o When you share photos with other Memory Manager users, they will see the folder(s) the photos were in, your Star Rating and journaling.
o Ability to determine how you want to view your photos – old to new, new to old, alphabetical, etc.
o New users can import photos and keep the current file structure. If a user has photos in organized folders on a computer, these folders will appear in Memory Manager when the photos are imported.
o You can merge Memory Vaults.
o New Microsoft Ribbon Technology matches the latest Microsoft software making it even more user-friendly.
Memory Manager has always brought you features especially designed for scrapbookers. Here are a few of our favorite standard features:
o The unique Memory Vault saves photos in one place, rather than scattered on the computer.
o The automatic backup function ensures a backup copy of all photos.
o Memory Manager never overwrites original photos. Instead, originals are kept and all revisions are saved separately.
o Memory Manager gives you up to 5,000 characters for journaling, to tell the story behind each photo.
o Our PrintTrack™ feature keeps track of which photos have been printed.
o Once your photos are organized and edited, it’s easy to create a traditional scrapbook, PicFolio album or a StoryBook photo book.
Tuesday, May 26, 2009
Creating the perfect CUSTOM COVER for your Storybook!
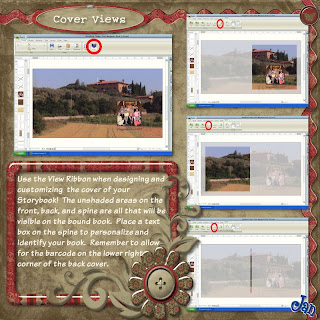
Ready to put the perfect cover on your StoryBook? Be sure to use the View Ribbon to make sure everything is just where you want it! First, go to the Home ribbon and change from "Pages" to "Cover" in the View section. You'll be able to view the default cover, which will either be an empty cover (if you have started with blank pages) or it will be the cover that comes with the pre-designed pages you are using. You may choose to select a different cover template, or you may import an existing cover. Choose whichever of these suits your current project.
Next, go to the View ribbon and look at the last three icons in the Preview section. You will be able to see exactly what will appear on the completed and bound front cover, spine, and back cover. Be aware that much of the 'total' view of the cover is not seen on the finished book due to the binding process. Use the ruler at the top and left side of the editing screen and the properties key (right click on any element, then choose properties) to help you position the elements on your cover.
Notice on the example page that you can fill the entire cover (front, back, and spine) with one photo. You can add other photos on top of it, or you can fill the cover with lots of photos. You can select a single image and add a title, you can put images on the front and not the back, or you can have images on both the front and back. You can design the cover any way you want it! You may use any paper you have or any color as the background of your cover - add gradients, texture, overlays - design the cover just like it is another page! The View ribbon allows you to see what the finished product will look like.
Add text boxes to title the book, and remember that you can even put a title, along with your name and/or the date, on the spine. To add text to the spine, simply create a text box that is wide across and narrow from top to bottom. Go to the Layout ribbon and rotate the text box 90 degrees to the right (clockwise). Using the Spine view, position the text box such that it will be visible on the spine. The actual text box can be slightly larger than the unshaded area on the Spine view as long as you are certain that the text itself will be printed only on the spine. This will allow you to use the largest font possible to create the text you'd like. I love adding my name to the spine and feeling like I am a published author!
The cover of your book will set the tone for the entire book, and an interesting cover will invite people to pick it up and look inside! Putting the title and date on the spine will allow you to quickly choose the book you want off the MANY StoryBooks on your shelves. Have fun with it!
shared by Jan McCallum, Creative Memories digital design team
Sunday, May 10, 2009
Instructions for upgrading & installing Memory Manager 3.0
If you already have Memory Manager 2.0 and you are upgrading you need to take these precautionary steps.
1. Open your Memory Manager Vault. (if you have more than one you need to do this with each one, open each vault one at a time and do steps 2&3)
2. On the top tab go to Memory Vault>Manage your Memory Vault. Then click on Run Health Check. If their is any thing that needs repair the program will walk you through it and it is really simple. If it is healthy it will tell you nothing needs to be done. Now this is important so that when your running 3.0 all your information will convert over.
3. Then you need to make a back up of your vaults. (I am NOT talking about a shadow copy. You need to go wherever your vault is stored and make a copy. This could take over an hour or so to copy depending on how much information there is. (I'd get it started and go do something else) Do this for each vault. This is really just a extra safety step, not necessary but advised because your shadow copy for 2.0 will NOT work in 3.0.
4. After you have made your back ups it time to install 3.0. Either you have ordered a disk or a download from my website. (www.mycmsite.com/Helen)
NOTE: You need to have your serial number from 2.0 to activate your 3.0 upgrade. Either have your original 2.0 case with the serial number on the back OR find your serial number by going into MM 2.0 and go to Help>About
If you have a disk just insert the disk and follow the prompts. If you are going to Download a copy you can either save or run right from the link that you click to download. I first clicked on Run, but I also re-visited the link and saved a copy so and made my own disk. Be sure to write down the serial number. You will also get a link to download the user guide.
5. Once MM 3.0 is successfully installed you can remove and uninstall 2.0. Once your vault is moved to 3.0 it will no longer work in 2.0! To remove or uninstall go to your control panel and go to add or remove programs and find Memory Manager 2.0 on the list and click remove. (these instructions may differ if you use vista) That's it!
Wednesday, May 6, 2009
SB+ Tecnhique - Photo Mats Technique
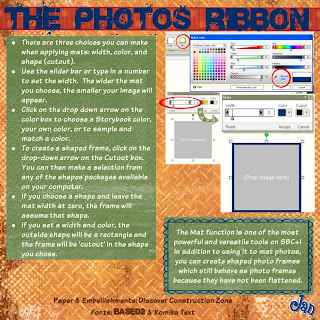
Did you know that you can use the mat tool to 'cut' photos into different shapes? That's what the cutout box is for on the Mat Tool!
To use the Mat Tool, you'll go to the Photos Ribbon. First, select the element (or elements) that you want to mat. Next, choose the width of the mat, then the color, and then the shape (cutout). If you don't choose a cutout, it will default to a rectangle, and you can easily mat all of the square and rectangular images on your page.
Remember that you can mat multiple images at once - just choose the first one, then hold the shift key while selecting all of the other elements you'd like to mat. This makes it easy to make sure all of the photos have mats the same size and color, which generally leads to a pleasing page. Be sure to use the color sampling tool to match mat colors with other colors on your page.
To 'cut' a photo or photo frame into a shape, don't choose a width or color, and choose the shape you'd like. Now the mat tool will make the picture the shape you've chosen. It's an easy way to 'round the corners' too. Just leave the mat width at 0, leave the checkerboard (opacity) instead of choosing a color, and then choose the shape that has rounded corners (from the Geometric shapes package). Play around with it!
If you select a color and a cutout, the Mat tool only makes rectangular shaped mats, with the shape you've chosen cut out around the photo. In other words, it would be like putting an oval or circle shaped photo on a rectangular or square mat.
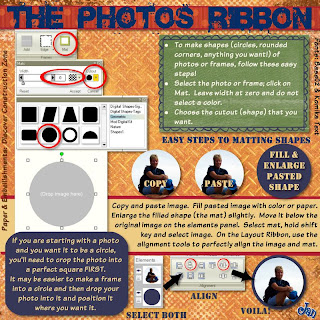
If you want a photo 'cut' into a circle and mounted on another circle, the best way to do that is to use the mat tool so that the photo will retain its photo properties - you will still be able to zoom in on it, move it around within the frame, edit it, etc. The easiest way to make sure your image will be a perfect circle is to add an empty square photo frame to your page. Right click on it, go to Properties, and make sure that it is a square. Correct measurements here, if needed. Now use the mat tool to make the frame a circle and then add your image to it. An alternate method is to cut the photo with the cutting tools, but this requires flattening, which means the photo will no longer behave as a photo. We will get into flattening later - don't stress over it now!
Once you have your shaped photo (regardless of the shape you've chosen), it's a snap to mat it. This is what I do (and there are other ways!): Copy the shape you just made and paste it. Drag a corner of the new shape to enlarge it slightly. Fill it with the color or paper (tools ribbon) you want. On the elements panel, drag it down so that it is under the image you want to mat.
Select the mat, hold the shift key, and select the original photo, too. On the layout ribbon, in the alignment section, click on the second button from the left on the top row and the next to last button on that same row (align selected elements vertically & horizontally with last selected element). I always go ahead and group the two while they are still both selected and I'm on the layout ribbon anyway. Now you're all matted and ready to go! Have fun with it!
Wednesday, April 22, 2009
Thursday, April 9, 2009
"Harvesting" digital goodies!
Have you seen others using goodies from predesigned pages, then wondered just how to get those parts and pieces into your own personal stash to use over and over again? It's actually quite simple! :)
First, you will need to create a project that will serve as a "workspace" for you to save out elements pulled from the predesigned pages. To do this, create a new project. Select the project size based upon the size of predesigned pages you will be pulling elements from. (So if you have a 12 x 12 Predesigned Recipe Book Kit, choose Storybook - 12 x 12 project size). Choose "Blank" for the theme, click "Next" and name this project something like "workspace".
Next, you'll need to create the predesigned book to pull elements from. Create a new project and select the same sized project as the first. Next, choose the predesigned page kit you want to pull elements from, then select "Next". To make it easier to remove the book after we're finished using it, name it "HarvestBook". (You can save this anywhere - your desktop, or somewhere else on your hard drive that will be easy to locate later).
Once the predesigned pages are ready for you to work with, begin clicking through the individual pages looking for individual elements on each page that you find interesting. To save out an individual element, click on it, copy it, and then click over to the "workspace" project. Paste the element on the workspace. Drag element to near full size on workspace. Right click on the element, then click on "Save Selection". This should default your file to save as a .png file. (Save this is a location where you will find it later). After saving, delete element and click back over to predesigned page project. Continue through all pages, saving out all components from this kit, then close the predesigned pages file. After you have all elements pulled that you need, click here to learn how to add those embellishments to your own batch for use in StoryBook Creator Plus.
After you are finished "harvesting" goodies from a predesigned page project, you can delete it from your hard drive to regain that space. When you create the next predesigned project to harvest goodies from, name it the same thing so you can keep track of what you need to delete.
Looking for some suggestions on what some favorites are for grabbing goodies from predesigned pages? The 12 x 12 Recipe Predesigned Pages is loaded up with goodies - distressed frames, torn edges, ribbons, stitches, a very cool bow, a cool flower, etc. There are several free downloadables themes that are great, too - Vintage Blues, Holiday - Traditional, Seasons, etc.
Have fun!
Monday, April 6, 2009
Embossing your digital papers
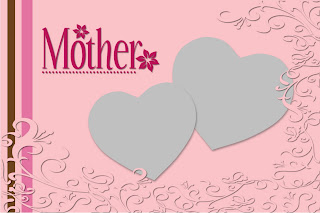
Here's how to get an embossed look to your papers in StoryBook Plus in 3 EASY steps:
1. Choose a Paper.
2. Choose an overlay ( used Digital Overlays-Floral) and make it the same color as the background. The overlay will seem to disappear.
3. Apply a light shadow (found in the TOOLS ribbon) to the overlay and you will get an embossed look.
Wednesday, April 1, 2009
Word Merge - Digital Scrapbook Technique
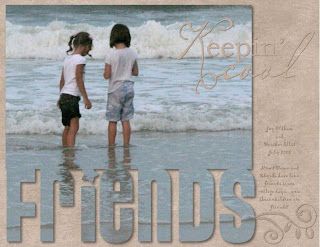
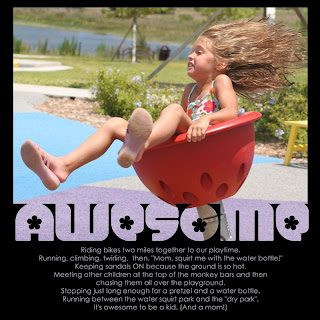 Word Merge is a fun technique that allows your photo to flow into text! To get this look, start on a blank 12 x 12 Page in StoryBook Creator Plus.
 Bring the photo onto your page.
(Works best with photos that have the focal point more toward the center of the photo...you can always crop as needed, which is explained below!)
Next, make a text box and type in your word of choice using a “chunky, wide, font.” (Go to Dafont.com to look for some if you need them. On their first page, they have instructions on getting the fonts into your computer!)
Once you have made the text large enough to reach from side to side of your page, go to the top of the screen in the Layout tab and click, “Flatten” to flatten your text.
Now, move the text until it just touches your photo.
Next, hold your shift key down, and click on the photo and the text box. (You will see that they are both gray on the left of the screen in the elements section.)
Now, go back to the Layout tab at the top of the screen and click, “Flatten” again. You have just created ONE element out of the two.
Last, go BACK to the right of the screen and right click on your original photo and choose, “Fill selected element with this photo”.
Your photo will now flow down (merge) into the words you have added!
If your photo is not filling the area just the way you want it to, note that it is filling from the TOP LEFT of the photo you are clicking on in the thumbnail view. You may need to CROP the photo in thumbnail view by right clicking on it, choosing “Crop” and cropping a bit closer in.
Page design by Dawn Oldham
Sunday, March 29, 2009
Making, Saving & Sharing a digital "workable template"
Making and Importing "Workable Templates"
How to save a file as a "workable template":
- Create your page or card in StoryBook Creator Plus. If you only want to save ONE page or card, create it as the ONLY page within that project.
- Once you have it just the way you want it, click on "Save".
- On the Home Ribbon at the top of the screen, click on the drop down arrow below the Save Icon.
- Choose the second choice, "Save As". You can choose to rename your page or card.
- Browse to a folder that you will remember, and save your page to that folder.
- Now, you are able to share that card or page as a workable template by emailing it as an attachment!
The recipient of the card or page can import your project into their StoryBook Creator Plus by following these steps:
- DOWNLOAD the item onto the computer desktop or into a folder. Do NOT try to open" the card or page.
- OPEN or CREATE a same-sized project in StoryBook Creator Plus.
- For example, if the item is a 4 x 6 landscape card, you would need to open or create a 4 x 6 landscape project.)
- Go to the Home Ribbon at the top of the screen and click on IMPORT PAGE BROWSE to the place the card was downloaded and import it.
- It will come in as a workable template and can be customized, printed and shared!!!!
Baby Chick Scrapbook Accent
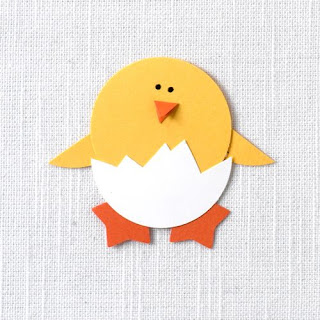
Ingredients:
Cardstock - White, Gold, Orange
Circle Maker
Mini Star Maker
Scissors
Fine-Tip Pen - Black
Precision Point Adhesive
How to Create:
Using Circle Maker, punch large circle shape from both white and gold cardstock. Using scissors, cut zig-zag pattern down center of white piece. Adhere white piece to bottom of gold circle.
Using Mini Star Maker, punch two small star shapes from orange cardstock. Adhere star shapes behind white piece using Precision Point Adhesive.
Using Circle Maker, punch small circle shape from gold cardstock. Using scissors, cut small slivers from edge of this circle shape, then adhere to backside of chick's body to form wings.
Fold small section of orange cardstock in half. Using scissors, snip small piece into triangle shape to form beak. Adhere to chick using Precision Point Adhesive. Draw eyes with fine-tip pen.
Project Created by:
Bekki Reighard, Creative Memories Design Team
Wednesday, March 25, 2009
Chilli Peppers - Digitally or Scraped
Paisley Maker Chili Peppers
How to Create them Digitally -
- Go to “shapes” tab and “shapes 1” and find the paisley shape and select “cut shape out of piece of paper”. Choose a red paper from the Primary Digital Power Palette.
- Repeat step 1, cutting out of green paper from the Primary Digital Power Palette.
- For the “tops” go to the “shapes” tab and “shapes1” and find the burst1. Select “cut shape out of a piece of paper” and choose a dark green from the Primary Digital Power Palette. Cut shape and position on top of the paisley shape and then you have a chili pepper.
1. Punch the "paisley" out of the Paisley Shape Maker (currently ON SALE 30% off!!) in red and green papers. Punch the "top" from our Galaxy Micro Maker. The splat shape is used here. The splat shape also creates a fabulous grass border for your summertime pages.
Monday, March 16, 2009
Memory Manager is ON SALE!
Combine Memory Manager with the Click it I Collection! Here is the break down
Click it I includes
Storybook Creator Plus, Doodles and Swirls Content CD and Blush Blooms and Best Buds CD with Coupon worth $39.95.
Add Memory Manager and your total is $128.95 with S&H and Tax your total is $149.01
If you were to purchase Click it II which includes Storybook Creator Plus, Memory Manager and Blush Blooms and Best Buds CD with Coupon worth $39.95. Your total would be $129 with S&H and Tax your total is $149.07.
So you can see the difference. Same money....but the first option is a much better deal with MORE digital stuff!!
Thursday, March 5, 2009
Fun FONTS....find & install them
There are several free sites that you can visit to browse and download fonts. Some of our favorites are:
http://www.dafont.com
http://www.urbanfonts.com
After you download the fonts of your choice, you will need to install them to your machine. On Vista machines, you will need to extract font files from zip files, then go into your Control Panel and install fonts to your machine. On other Windows Machines, simply extract the font files, then copy them to the C:\Windows\Fonts directory on your computer. NOTE: if you install fonts while StoryBook Creator Plus Software is open, the fonts will not immediately appear. Close the software, then relaunch to make fonts available.
Monday, March 2, 2009
Happy St. Patrick's Day digital card
Digital Scrapbook Project Idea - Four Leaf Clover Card
- Storybook Creator Plus
- Delight Power Palette Kit
- Digital embellishments - Sewing Room -
- Primary (for stitches)
- Digital embellishments - Sewing Room - Baby Girl
- Fonts used- Century Gothic and Gloucester MT Extra Condensed
How to create:
- Open a new 4x6 project.
- Add Paper22 to workspace. Next cut shape as shown out of Paper18. Place centered on workspace.
- Add four leaf clover embellishment (click here to download this embellishment) onto workspace. Center in the middle of the shape.
- Add two stitches to each side of the shape.
- Add pink ribbon across the bottom of the card.
- Lastly, create a text box for sentiment.
Finished size: 4x6
WISHES - pop up inspirational card
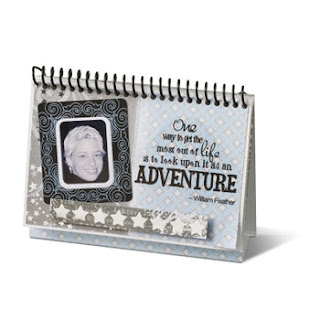
Simply dress up a pre-purchased stand-up notepad (available at most dollar stores) with some paper, embellishments and a photo for a great inspirational gift! Perfect for the desktop at the office, college or home!
How to create:
Simply cut piece of blue diamond patterned paper to fit on page. Add title sticker, photo framed with black frame sticker and star strip embellishment adhered with foam squares.
Project created using Wishes & Dreams Kit, Scissors and Foam Squares.
Designed by Clarissa Romano
How to create a digital card!
Creating custom cards in SBC+ three ways
Hi there! :) I'm going to show how you can create quick and easy custom cards three different ways using Storybook Creator Plus. :) The first card will be printed out and used just as is - flat with no dimension. The second card will be embellished using some digital embellishments that I'm going to print out and attach to the card. And the third card I'm going to create will be one that I create a foundation for in StoryBook Creator Plus and then print out and embellish using other wonderful Creative Memories traditional product goodies! Let's begin!
Note: I will be creating the first two cards on one workspace so that they can be printed on one letter sized piece of cardstock to save paper. The third card will be created on one workspace as well, along with the digital embellishments we need for the second card. That way we can save time and paper and print them out together on one sheet. :)
First card: Card with no dimension & Second card: Card with printed out digital embellishments
Ingredients:
First card:
- StoryBook Creator Plus Software
- Delight Power Palette Digital Kit
- Digital Embellishments - Sewing Room - Romance
- Digital Embellishments - Sewing Room - Baby Girl
- Font used: Century Gothic
Second card:
- StoryBook Creator Plus Software
- Delight Power Palette Digital Kit
- Digital Embellishments - Doodles
- Digital Embellishments - Sewing Room - Baby Girl
- Colored pencils
- Foam tabs
- Black Swirly ABC/123 letter stickers
- Font used: Century Gothic
How to create both cards:
- Create a new custom project that is a 8.5 x 11 landscape project.
- Add Paper23 to background.
- Unlock background paper and restore aspect ratio by clicking on paper and then clicking "aspect ratio" and then "restore aspect ratio."
- Cut rectangular shape out of Paper16. Add on workspace as shown going all the way across the bottom of the project. Place it 5.25 inches from the top (right click on paper and then click on properties to change top to 5.25).
- Add label embellishment 0.50 from the left centered.
- Next add "blessings" embellishments to label centered, leaving room below for more of the sentiment.
- Place "blessings" 5.94 from the top of the label.
- Create text box and add "to you" below "blessings." Use color tool to change color to dark brown.
- Add green polka dotted ribbon from the Digital Embellishments - Sewing Room - Baby kit along the bottom of the striped paper all the way across the card.
- Add a button to each hole in the first card's label.
- Create text box for "created with love by ..." and place at the top of each card centered - 1.375 from left. Rotate text box 180 degrees so that when it's printed it will be placed correctly (you can click on text box, then properties then change the rotation to 180).
- Save project as a jpeg. (To do this, click on the "Home" tab. You will see a blue disk icon, and under you will see the word "Save" with a down arrow next to it. Click the Down Arrow and choose "Save Pages As". Choose the folder to save your project in, enter project name in "Start File Names With", select "Current Page" and make sure the Resolution is set at "Best, 300 DPI". Click "Save" and your project will be saved out as a jpg.
- Print out project (be sure to check borderless printing in your printing settings) and cut paper in half length-wise. Fold those sheets in half to make two cards.
- Stick the first card in an envelope as is and mail it off to someone. It'll make their day. :) Set aside the second card for just a bit. We're going to go and create the third card and the digital embellishments we're going to use for the second card.
- Once you've printed out the Digital Embellishment - Doodles with the third card, color them with colored pencils, cut them out and then add to the card as shown. I did some layering using foam tabs for great dimension. I also added the little doodled heart to the sentiment on the back using foam tabs. :)
Finished sizes:
5.5 x 4.25
Third card: Custom card created in StoryBook Creator Plus with added traditional embellishments
Ingredients:
- StoryBook Creator Plus Software
- Delight Power Palette Digital Kit
- Delight Power Palette Kit (Traditional)
- Meadow Micro Maker
- Font used: Century Gothic
How to create:
- Create a new 8.5 x 11 landscape project.
- Cut 8.5 x 5.5 rectangle shape out of Paper23. Place on left side of the workspace.
- Cut 5.5 inch wide rectangle out of Paper16 and place 5.25 inches from top.
- Create text box at the top of the workspace - centered in the middle of the orange paper. Add "created with love by..." sentiment. Rotate 180 degrees (See above for how to do that)
- In the empty workspace, add the following embellishments: Heart2 (change size to 1.11x 1.28), Heart1 (change size to 0.75 x 0.89) and CircleFrame3 (change size to 2.75x2.62).
- Save project as jpeg.
- Print out (be sure to set your printer settings to borderless).
- Cut in half lengthwise. Fold first half into card. Add label sticker, "Dream sticker" and punch out some mini butterflies using the Meadow Micro Maker punch. Cut out strip of yellow paper and hand cut scallop. Place on card as shown.
- See #15 above (in the first set of instructions) to see what to do with the digital embellishments you printed out.
Finished size:
5.5 x 4.25
Thursday, February 12, 2009
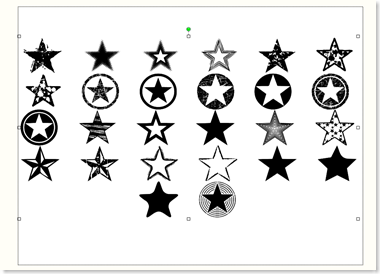
Making DINGBATS into embellishments in Storybook Creator Plus
Dingbats are a font that uses shapes instead of letters.
First, Check out these free sites that have LOTS of dingbats
http://www.urbanfonts.com/free-dingbats.htm
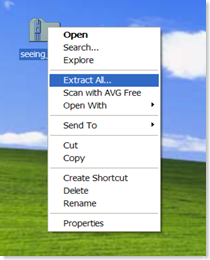
Download a dingbat font to a folder or your desktop. It will be a zipped folder so you will have to right click and extract the folder.
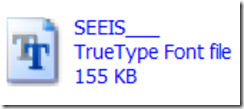
Then go to the Control Panel and open your Fonts folder. Then open the new extracted folder and grab the TrueType Font file and drag it into the Fonts folder and your new font will install. You can now delete the folders (off your desktop) that you just downloaded from the website.
Now open your Creative Memories Storybook Creator Plus Program. Choose Open or Create a New Project.
On a Blank Page, Create a Text Box.
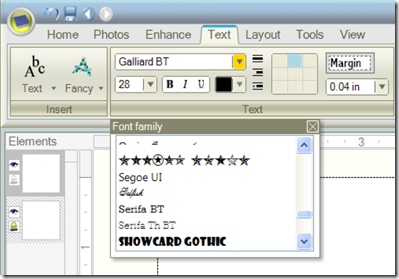
Then select the new font you just installed from the font menu. It will not show the name of the font but you will see the images and it will be in the alphabetical order of the name of the font.
Then type out the Alphabet A-Z.
You will be able to see all the different dingbats because each one is a different letter.
Tip: a space between each letter will make it easier when we cut them out.
Now right click on the text box and choose Flatten OR Flatten the text box from the Layout Bar. Now you can adjust the size by dragging the corners.
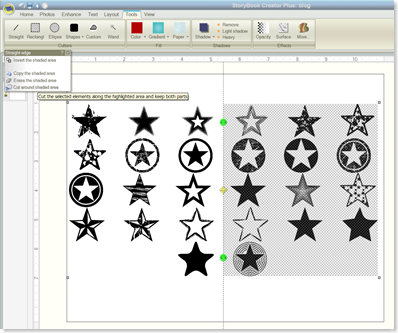
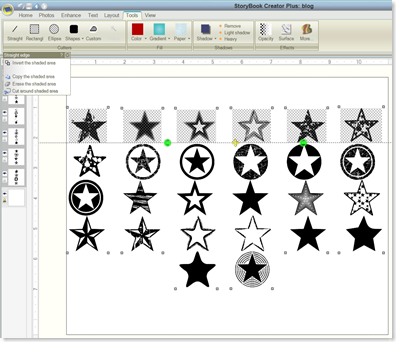
By using the straight cutter tools crop the stars out in a grid pattern first by column and then by row. Then choose the option to "cut around the shaded area."
Tip: Make sure you you have all the layers selected in the row or column you are cropping.
Once your done each star should be an individual element.
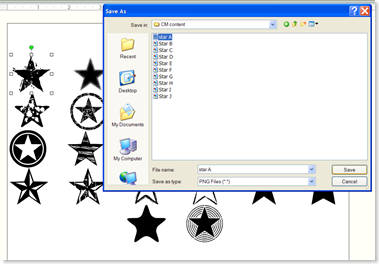
Then you will save and name each one by selecting one at a time, right click and choose "Save Selection". The program will automatically save the file as a .png file and will add that file extension to your name.
I named them by type and letter. So the first Star is made by the letter A, so I named it Star A.
Tip: I saved all of these into a folder that I created on my desktop for all my CM stuff called "Helen's Papers & Embellishments" and I always use this folder to download stuff that I will be using for SBC+. You can also back-up this creations onto a CD and even share them with your storybook friends via email or CD.
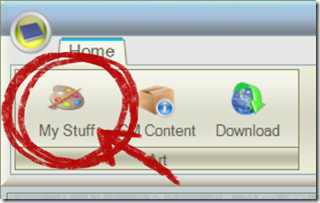
Now you have to bring these into the program by going back to the Home screen. Select the 'My Stuff' icon from the top left-hand corner.
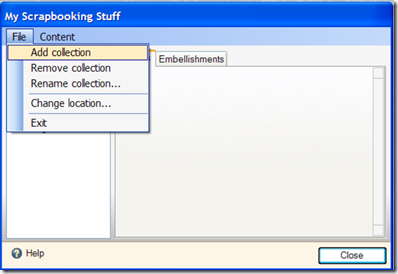
Select File>Add Collection
Then give it an appropriate name. I would suggest using the term "Helen's Dingbat Stars" so you remember where you got them later. I use MY NAME before any collection that I created in MY STUFF so that I can easily scroll to it while using my SB+ program. The collections are filed alphabetically and this way everything that I created all starts with "Helen's ..." Super easy to locate!
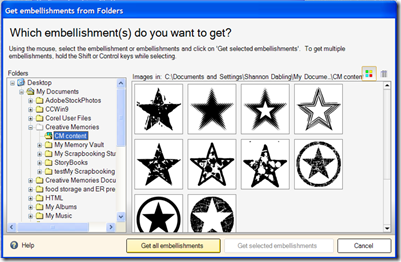
Then go to Content>Add Embellishment, browse for the folder on your desktop where you saved your dingbats. Then 'Get all embellishments'
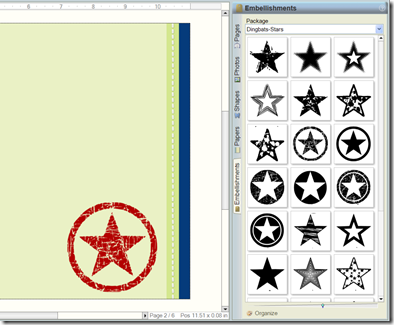
Now all these Dingbats will be available in any project from the Embellishments Panel.
And now you can use them on any page, fill with color, paper, change the opacity, etc.
Hope you enjoyed this Tutorial on Using Dingbats.Monday, February 2, 2009
Digital Valentine Cards
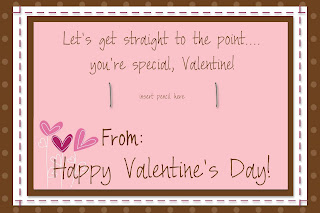
Create these adorable Valentine cards with the Storybook Plus program. The papers and enhancements are from the Primary Valentine Digital Power Palette Addition and the With Love Digital Kits. There's even room to add a 'pencil' to this one!
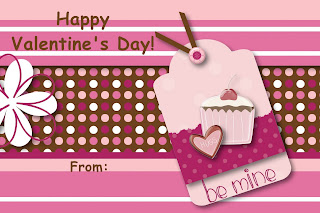
Valentine TAGS!
 I created these tags using the "leftover" supplies I had AFTER I created the With Love Paper Album Kit! Creative Memories is so generous when they design projects. I've always had extra supplies. Think of all the fun Valentine gifts you can jazz up with your special tags. They also make great enhancements to your album pages or as accents on our Everyday Display Boards. Be sure to use the Precision Point Adhesive when you stick down the Sweet Heart Maker pieces and smaller items.
Monday, January 26, 2009
Valentine CD case
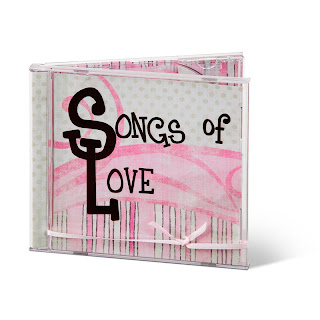
Give your valentine the gift of beautiful music. Choose a list of songs that have special meaning for the two of you, then burn them to a cd. Decorate an empty jewel case for a special gift that will be used over and over.
To Create:
Measure size of cd case cover, then trim patterned paper to measure the same size. Adhere letter stickers to this piece, then insert into cd case. Tie ribbon around CD cover, then trim. Repeat this for backside of CD case. Insert this piece into case.
Measure width of spine of CD case, then cut white patterned paper to fit. Adhere to spine.
Project created using Primary Valentine Power Palette Additions, Swirly Brown ABC/123 Stickers, Swirly Brown Monogram Stickers and Ribbon.
Designed by Nicole Henrichs
Valentine's just for YOU!
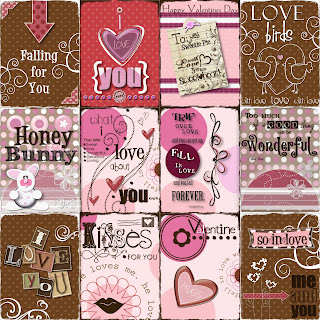 Want completely adorable valentines like this, but don't want to have to worry about creating them yourself? It's your lucky day! Simply download this sheet of valentines (a high resolution .jpg), upload to the Creative Memories Photo Center, then order as a 12" x 12" page print. You'll receive a full sheet of valentines ready to be cut and sent! If you don't have an account, set one up free with my CM ID # 91008757.
Using Pre-decorated Pages in your projects...
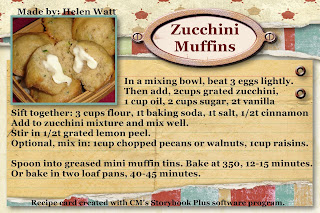
This recipe card was created with the Creative Memories Storybook Plus Recipe Digital Kit and 8x8 Pre-decorated pages. There are different products in each and I love to mix them together. Here's how: Open a new project with the pre-decorated pages. Then "select" the items you want to use in a 4x6 recipe card (like this one). After selecting them, right click and COPY. Then open your 4x6 project and right click and PASTE. You will need to adjust the sizes of the elements to fit this new project. You may also want to add some elements from the Recipe Digital Kit to finish enhancing it. Then add text and a photo as needed. Great to give along with the actual muffins the next time you stop by your friend's home for coffee. Upload and print them at the CM Photo Center. You can sign up for a free account using my CM ID # 91008757.
Monday, January 12, 2009
DIGITAL video about Memory Manager & Storybook Plus
Creative Memories is on You Tube!
Sunday, January 11, 2009
January 2009 Calendar & instructions on how to create a png file
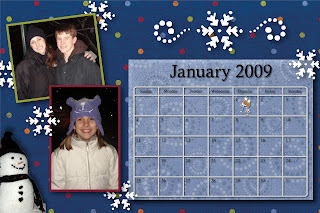 This calendar page was created with the Creative Memories Storybook Plus software (SB+). Once you have the software installed on your computer.....simply download the FREE calendar grids from my website www.mycmsite.com/Helen The background papers came from the digital kit Blush Blooms & Best Buds CD and I created the snowman "sticker" as a png file. To create a png file, follow these steps:
*Import your picture into SB+
*'Flatten' your image
*Use the "wand" on the TOOLS ribbon, click around the snowman and delete the unwanted parts.
*Export the edited image to your desktop and save as a png file
*Go to the SB+ home page and open "My Stuff"
*Open a new collection and add your png file as an embellishment
You can now use this embellishment on any SB+ project. A great way to turn your child's artwork into your own stickers! How cool is that!
Thursday, January 8, 2009
Snow People Faces layout ideas
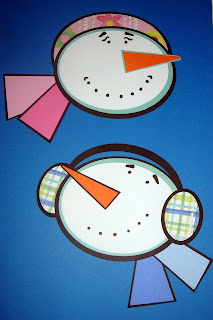
These adorable Snow People faces were created with the Creative Memories Custom Cutting System and Oval Template set. To create the "ring" for the earmuffs, simply use the BLUE blade to cut around the outside of your 4x6 template. Then, without moving the template switch to the RED blade and cut around it again. This will give you a "ring" of paper. I used the Precision Point adhesive to adhere it to the back of the Snowman Face.
Snowman Page Layout Ideas
Tuesday, January 6, 2009
Christmas Card Photo album
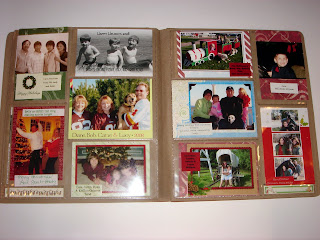
Continue to celebrate your family & friends, whether they are near or far, in the Picfilio Milestones album. Simply slide in their Christmas photo cards and enjoy. Some may need to be trimmed. Use the Christmas Milestones Kit to enhance your album. Super quick & easy! I've already got over 3 years of cards & letters in this one album...with room for more.
Christmas card Tag idea


Once you start taking down your Christmas decorations...be sure to recycle your cards into next year's TAGS for your packages, boxes and bags! Use the CM Tag Maker to punch the perfect image from the card. Sometimes you can get two or three tags from the same card.


