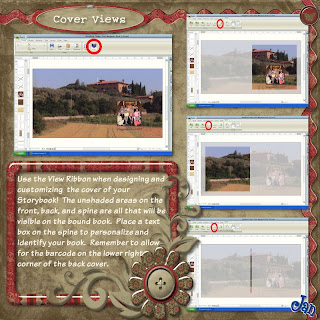
Ready to put the perfect cover on your StoryBook? Be sure to use the View Ribbon to make sure everything is just where you want it! First, go to the Home ribbon and change from "Pages" to "Cover" in the View section. You'll be able to view the default cover, which will either be an empty cover (if you have started with blank pages) or it will be the cover that comes with the pre-designed pages you are using. You may choose to select a different cover template, or you may import an existing cover. Choose whichever of these suits your current project.
Next, go to the View ribbon and look at the last three icons in the Preview section. You will be able to see exactly what will appear on the completed and bound front cover, spine, and back cover. Be aware that much of the 'total' view of the cover is not seen on the finished book due to the binding process. Use the ruler at the top and left side of the editing screen and the properties key (right click on any element, then choose properties) to help you position the elements on your cover.
Notice on the example page that you can fill the entire cover (front, back, and spine) with one photo. You can add other photos on top of it, or you can fill the cover with lots of photos. You can select a single image and add a title, you can put images on the front and not the back, or you can have images on both the front and back. You can design the cover any way you want it! You may use any paper you have or any color as the background of your cover - add gradients, texture, overlays - design the cover just like it is another page! The View ribbon allows you to see what the finished product will look like.
Add text boxes to title the book, and remember that you can even put a title, along with your name and/or the date, on the spine. To add text to the spine, simply create a text box that is wide across and narrow from top to bottom. Go to the Layout ribbon and rotate the text box 90 degrees to the right (clockwise). Using the Spine view, position the text box such that it will be visible on the spine. The actual text box can be slightly larger than the unshaded area on the Spine view as long as you are certain that the text itself will be printed only on the spine. This will allow you to use the largest font possible to create the text you'd like. I love adding my name to the spine and feeling like I am a published author!
The cover of your book will set the tone for the entire book, and an interesting cover will invite people to pick it up and look inside! Putting the title and date on the spine will allow you to quickly choose the book you want off the MANY StoryBooks on your shelves. Have fun with it!
shared by Jan McCallum, Creative Memories digital design team


No comments:
Post a Comment