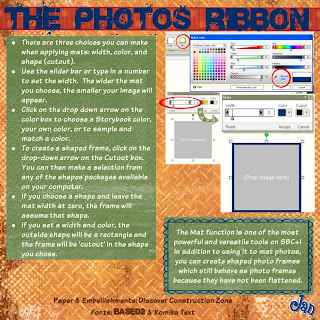

Did you know that you can use the mat tool to 'cut' photos into different shapes? That's what the cutout box is for on the Mat Tool!
To use the Mat Tool, you'll go to the Photos Ribbon. First, select the element (or elements) that you want to mat. Next, choose the width of the mat, then the color, and then the shape (cutout). If you don't choose a cutout, it will default to a rectangle, and you can easily mat all of the square and rectangular images on your page.
Remember that you can mat multiple images at once - just choose the first one, then hold the shift key while selecting all of the other elements you'd like to mat. This makes it easy to make sure all of the photos have mats the same size and color, which generally leads to a pleasing page. Be sure to use the color sampling tool to match mat colors with other colors on your page.
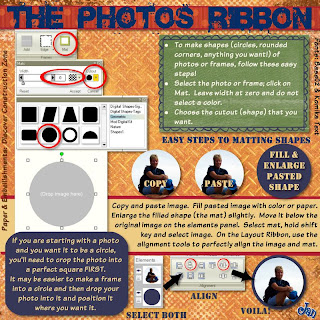
To 'cut' a photo or photo frame into a shape, don't choose a width or color, and choose the shape you'd like. Now the mat tool will make the picture the shape you've chosen. It's an easy way to 'round the corners' too. Just leave the mat width at 0, leave the checkerboard (opacity) instead of choosing a color, and then choose the shape that has rounded corners (from the Geometric shapes package). Play around with it!
If you select a color and a cutout, the Mat tool only makes rectangular shaped mats, with the shape you've chosen cut out around the photo. In other words, it would be like putting an oval or circle shaped photo on a rectangular or square mat.
If you want a photo 'cut' into a circle and mounted on another circle, the best way to do that is to use the mat tool so that the photo will retain its photo properties - you will still be able to zoom in on it, move it around within the frame, edit it, etc. The easiest way to make sure your image will be a perfect circle is to add an empty square photo frame to your page. Right click on it, go to Properties, and make sure that it is a square. Correct measurements here, if needed. Now use the mat tool to make the frame a circle and then add your image to it. An alternate method is to cut the photo with the cutting tools, but this requires flattening, which means the photo will no longer behave as a photo. We will get into flattening later - don't stress over it now!
Once you have your shaped photo (regardless of the shape you've chosen), it's a snap to mat it. This is what I do (and there are other ways!): Copy the shape you just made and paste it. Drag a corner of the new shape to enlarge it slightly. Fill it with the color or paper (tools ribbon) you want. On the elements panel, drag it down so that it is under the image you want to mat.
Select the mat, hold the shift key, and select the original photo, too. On the layout ribbon, in the alignment section, click on the second button from the left on the top row and the next to last button on that same row (align selected elements vertically & horizontally with last selected element). I always go ahead and group the two while they are still both selected and I'm on the layout ribbon anyway. Now you're all matted and ready to go! Have fun with it!


No comments:
Post a Comment